
There’s a spot in the back bedroom where every video call drops mid-sentence. You bought a $60 extender from the electronics shop, plugged it into the hallway, and it made almost no difference. Now you’re wondering whether the answer is a new router, a mesh system, or an electrician.
How to Fix WiFi Dead Zones in Your NZ Home
Before you spend anything: most WiFi dead zones in NZ homes come down to where the router is sitting, and that’s usually free to fix. This guide walks through diagnosing the problem properly, the fixes that cost nothing, and when you do need hardware what actually works instead of what merely sounds impressive.
Why you have a dead zone in the first place
Dead zones come from three things: distance, building materials that absorb the signal, and interference from other networks. In New Zealand homes, the most common cause is a router parked in the corner of the house where the fibre happened to be terminated, broadcasting half its signal into the neighbour’s garden.
Work out which of the three you’re dealing with and the fix becomes obvious.
The ONT problem nobody warns you about
When fibre was installed, the technician terminated it wherever the drill could reach an outside wall, a garage, a hall cupboard, the corner of a spare room. The ONT went there. Your router plugged in beside it. And that’s where your WiFi has broadcast from ever since.
It’s a wiring convenience decision that quietly became a coverage decision.
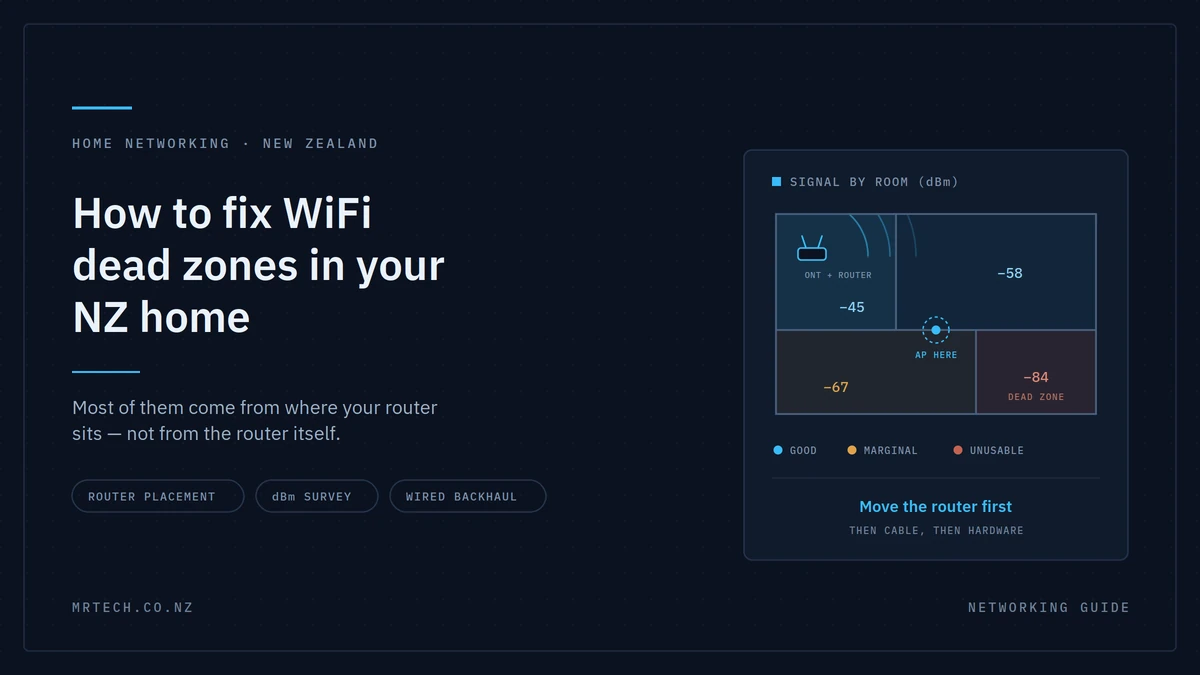
Here’s the part most people don’t realise: the router doesn’t have to live next to the ONT. You can run an Ethernet cable from the ONT to a better spot and put the router there. The ONT stays put, your WiFi moves to the middle of the house, and a surprising number of dead zones simply disappear.
What NZ building materials do to a signal
Not all walls are equal. In rough order of how much they hurt:
- Foil-backed insulation — The worst offender by a distance. Common in retrofitted walls and ceilings, and it behaves like a reflective sheet across the whole surface. A signal that sails through two gib walls can stop dead at one foil-lined one.
- Concrete block and brick veneer — Heavy attenuation, especially on internal block walls in 1970s builds.
- Corrugated steel roofing and steel framing — A real factor for getting signal between floors or into a roof space.
- Lath and plaster in older villas — Where metal lath was used, it acts like a mesh screen.
- Standard gib on timber framing — Barely a speed bump. If your walls are just gib, the problem is probably distance or placement.
Water, mirrors and the hot water cylinder
Water absorbs 2.4GHz and 5GHz signals well. A hot water cylinder in a hall cupboard, sitting between the router and the bedrooms, is a genuine obstacle and a very common floor plan in NZ houses.
Same for large mirrors, aquariums and header tanks. Worth a look at what’s physically between the router and the room that doesn’t work.
Interference and congestion, especially in townhouses
If you’re in a townhouse, apartment or a tightly packed subdivision, your neighbours’ networks are competing with yours. On 2.4GHz there are only three non-overlapping channels, and everyone is crowded onto them.
Microwaves and older cordless phones also sit in the 2.4GHz band. If your WiFi drops out while dinner is heating, that’s not a coincidence.
Diagnose before you buy anything
Measure signal strength in dBm rather than trusting the bars on your phone. Walk the house, write down a number for each room, and you’ll know within ten minutes whether you have a coverage problem, a congestion problem, or something else entirely.
How to actually measure
On Android, a free WiFi analyser app will show dBm, channel and the networks around you. On iPhone, Apple’s AirPort Utility has a scanner you enable in Settings, or you can run a speed test in each room and compare.
Record three things per room: signal strength in dBm, which band you’re connected to, and the download speed. Do it at the times of day the problem actually happens.
What the numbers mean
As a rough guide, not a formal standard:
- −30 to −50 dBm — Excellent. You’re close to the router.
- −50 to −60 dBm — Good. Everything works.
- −60 to −67 dBm — Usable. This is roughly the floor for smooth video calls.
- −67 to −80 dBm — Marginal. Web pages load, calls stutter.
- Below −80 dBm — Effectively unusable.
Dead zone, slow zone, or congested zone?
Three different problems:
- Weak signal, slow speed — A genuine coverage problem. You need signal closer to that room.
- Strong signal, slow speed — Congestion, or a bottleneck behind the router. Adding an extender here will make things worse, not better.
- Fine sometimes, terrible other times — Interference or channel contention. Look at what your neighbours are broadcasting on.
That middle case is where most money gets wasted. Check it before you buy.
The free fixes to try first
Move the router, fix the channels, and sort out your bands. These cost nothing and resolve a meaningful share of dead zone complaints on their own.
- Move the router toward the centre of the house, and get it up off the floor shelf height or higher. If it’s tethered to the ONT, run an Ethernet cable from the ONT to a better location and move it there.
- Get it out of the media cabinet. Behind the TV, inside a cupboard, or under a pile of paperwork are all bad. It needs open air around it.
- Set 2.4GHz to channel 1, 6 or 11 — whichever your neighbours use least. Those three don’t overlap; anything else does.
- Leave 5GHz on auto, but check your router isn’t locked out of the higher channels unnecessarily.
- Consider splitting your SSIDs into separate 2.4GHz and 5GHz names if devices keep clinging to the wrong band from across the house.
- Update the firmware and reboot properly. Unglamorous, occasionally decisive.
Re-measure after each change. You may not need to buy anything.
2.4GHz, 5GHz and 6GHz: why faster doesn’t mean further
Lower frequencies travel further and pass through walls better. Higher frequencies carry more data but over shorter distances and through less material. That trade-off is physics, and no amount of marketing changes it.
| Band | Range | Through walls | Congestion | Best for |
|---|---|---|---|---|
| 2.4GHz | Longest | Best | Heavy | Far rooms, IoT devices, cameras |
| 5GHz | Moderate | Moderate | Moderate | Everyday use at normal distances |
| 6GHz (WiFi 6E/7) | Shortest | Weakest | Very light | Same-room, high-bandwidth use |
The implication is blunt: if walls are your problem, a WiFi 7 router will not fix it. 6GHz is the least likely band to reach your back bedroom. A new router with a bigger number on the box solves congestion and same-room speed, not coverage.
If someone at a retail counter suggests a faster router for a distance problem, they’re selling, not diagnosing.
The fix that actually works: wired backhaul to a second access point
Run an Ethernet cable to the far side of the house, put an access point there, and the dead zone stops existing. Every other paid option is a workaround for not doing this some of them reasonable, all of them slower.
Why a wired AP beats a repeater
A repeater or extender receives your WiFi over the air, then rebroadcasts it over the air, using the same radio to do both. In practice that roughly halves the usable throughput at every hop and it’s still relaying whatever weak signal it received in the first place.
An access point on a cable gets the full connection delivered to it. It broadcasts a strong, clean signal from a good position rather than an amplified weak one.
PoE makes it a one-cable job
Power over Ethernet sends power and data down the same Cat6 run, so an access point can go on a ceiling or high on a hallway wall with no power point anywhere near it. That’s exactly where you want an AP and exactly where there’s never a socket.
Whether you need a PoE switch or just an injector depends on how many devices you’re powering our post on that comparison covers the decision properly.
Where to put the second AP
- Central and high. Ceiling-mounted beats a shelf; a shelf beats the floor.
- Roughly midway between the router and the problem area — not inside the dead zone.
- Two well-placed access points beat four badly placed ones. More radios in the same space means more interference with each other, not better coverage.
For choosing an actual model, our UniFi access point buyer’s guide runs through the lineup. You can also browse networking gear at Mr Tech with NZ stock and local support.
What if you can’t run a cable?
Renting, solid walls, or a landlord who won’t allow drilling all fair reasons. There are real options, and they’re worth ranking honestly by what they cost you in performance.
- Powerline adapters. Send data over your existing electrical wiring. Works well when both sockets are on the same circuit; degrades badly across circuits, through RCDs, or in older wiring. Cheap enough to try, and returnable if it doesn’t help.
- MoCA over coaxial cable. You’ll see this recommended in American guides. Most NZ homes don’t have distributed coax, so it rarely applies here.
- Wireless mesh. A legitimate last resort. Works, and modern systems handle handover well but each wireless hop still costs you throughput, and nodes must be placed where signal is still decent, not in the dead zone itself.
- Point-to-point wireless bridge. For gaps that are outdoors house to sleepout, house to garage.
If you’re renting: flat Cat6 cable runs under door frames and along skirting boards, held with adhesive clips that come off cleanly. Many tenancy situations allow that where drilling isn’t permitted. Check your agreement, and keep the cable tidy and removable.
Comparison: what each fix costs you
Ranked roughly from cheapest to most involved. The right one depends on whether you can run cable and how much throughput you need at the far end.
| Fix | Approx. NZ cost | Effort | Throughput impact | Renter-friendly | Best for |
|---|---|---|---|---|---|
| Move the router | $0 | 10 minutes | None — usually improves | Yes | Almost everyone, first |
| Change channels / split bands | $0 | 15 minutes | None | Yes | Townhouses, apartments |
| Ethernet from ONT to better spot | ~$20–60 cable | Half a day | None | Sometimes | Router stuck in a garage or corner |
| Powerline adapters | ~$80–200 | 15 minutes | Variable, often significant | Yes | Renters, single-circuit runs |
| Wireless mesh | ~$300–800 | An hour | Roughly halves per hop | Yes | Renters wanting whole-home coverage |
| Mesh with wired backhaul | ~$300–800 + cable | A day | Minimal | No | Owners wanting simple management |
| Dedicated AP on Ethernet | ~$165–650 + cable | A day | Minimal | No | The reliable fix |
| Outdoor AP or bridge | ~$300+ | A day | Minimal | No | Sleepouts, garages, detached units |
The sleepout, the garage and the detached unit
A detached building needs either a buried Cat6 run or a point-to-point wireless link. Indoor WiFi won’t reliably cross two exterior walls and a stretch of garden, and no amount of repositioning changes that.
Two workable approaches:
Buried cable. Direct-burial rated Cat6 or standard cable in conduit. Conduit is more work upfront and far easier to repair or upgrade later. One thing to raise with an electrician: copper running between two separate buildings introduces surge and earthing considerations, and there are ways to handle that properly.
Wireless bridge. A pair of outdoor units with line of sight between them, or an outdoor-rated access point mounted on the house facing the sleepout. Less digging, and usually plenty of bandwidth for a home office.
Mistakes that make dead zones worse
- Stacking extenders. Each hop halves throughput. Two extenders in series is a quarter of your speed.
- Hiding the router in a cupboard or media cabinet for tidiness.
- Buying a faster router to fix a distance problem.
- Placing mesh nodes inside the dead zone, where they have nothing good to relay.
- Leaving sticky devices connected to a distant AP because everything shares one SSID and nothing forces a handover.
- Running network cable hard against mains wiring for long parallel stretches.
FAQs
Why is my WiFi bad in one room but fine everywhere else?
Usually something physical sits between that room and the router foil-backed insulation, a concrete wall, or a hot water cylinder or the room is simply at the far end of the house from a router placed in a corner. Measure the signal in dBm in that room to confirm which.
Do WiFi extenders actually work?
They work, but with a cost. An extender receives and rebroadcasts on the same radio, which roughly halves usable throughput, and it can only rebroadcast the signal it receives. Placed halfway to a dead zone they help a little; placed inside one they achieve almost nothing.
Is mesh WiFi better than an access point?
A mesh system is easier to set up and manage. An access point on a wired connection performs better because it isn’t relaying over the air. Mesh with wired backhaul gets you both, and is a sensible middle ground if you can run one cable.
Will a WiFi 7 router fix my dead zone?
Probably not. WiFi 7 improves speed and congestion handling, mainly on the 6GHz band which has the shortest range and the weakest wall penetration of the three bands. If your problem is distance or walls, a newer router alone rarely solves it.
Can I move my router away from the ONT?
Yes. Run an Ethernet cable from the ONT to wherever you want the router, and leave the ONT where it is. This is one of the most effective fixes available and it’s often overlooked because people assume the two must sit together.
How do I get WiFi to my sleepout or garage?
Either buried Cat6 to an access point in the building, or a point-to-point wireless bridge with line of sight. Relying on indoor WiFi to reach through exterior walls and across a garden is unreliable, particularly in wet weather.
Does foil insulation block WiFi?
It significantly attenuates it. Foil-backed insulation behaves like a reflective layer across the wall or ceiling, and it’s one of the more common reasons a signal that should reach a room doesn’t. It’s also a good argument for a wired access point rather than trying to push signal through it.

 No products in the cart.